Showing posts with label manicure. Show all posts

Thursday, 25 September 2014

Nail Art Trio in 5 Simple Steps!

The wonderful Sarah Scott owner of the blog beautyblundersandotherwonders.com asked me to be a guest blogger while she was away in Florida! If you love finding out about the lastest beauty buys and knowing about the best dupes (including the naked palette!) you would love reading all the adventures she gets up to!
You can also check out this post over at Beauty Blunders if you click the link up there.^^^^ 
So I've put together a trio of Nail tutorials were you can create the designs yourself in 5 or less simple steps.
I used fake nails because my nails are abit short atm. I prefare working with longer nails anyways so its win-win situation LOL.

 These are all the materials I used...


These nails are GREAT! I got them in pennys for €1.50, bargain I know! I got the nude ones because they are easier to paint over. I picked out different nail sizes and stuck them on a nail wheel with blue tack so they would be easier to paint.


First design: The 'Yin-Yang'. 

Step one: Paint the nail using a thick white polish. I used a 'Barry M' white and did 3 coats. Some whites can be watery so make sure you do enough coats to make sure no other colours are popping through. 
Step two: I got a brush and painted the swirl of the yin-yang on the nail using black acrylic paint. 
Step three: When this dried in I painted one half of the nail black.
Step four: I then got a black and white dotting tool and made a big dot in the opposite colour from the half I was painting. 
Step five: Wait until dry and apply a clear top coat 


Second design: 'Aztec'

Step One: Using a thin brush, paint two or three (depending on the length of your nail) black lines going across the nail. Don't worry if it's a tad messy we can fix it up laters;) 
Step Two: Fill in the marked off boxes with whatever colour you like. I choose an aqua green and reddish colour.
Step Three: Go over the black lines you originally painted and now try make them as straight as you can.
Step Four: Using black and white dotting tools and brushes design the colours you just painted with dots, lines, zigzags whatever you like. Get creative and make it your own!. I went simple and just painted zig zags and poka dots. 
Step Five: Wait till dry and apply a clear top coat.


Third design: 'Cheetah Print' #RAWR

Step One: Pick the colour/colours you want the cheetah dots to be. Make a few scattered dots (not too thick) all over the nail. Don't be afraid to mess up because it's all trial and error and about seeing what works and what doesn't.
Step two: Make little semi-circles using a black dotting tool around the coloured dots. It looks better if the semi-circles don't meet and there's a gap between them.
Step Three: Fill in the rest of the nail with little black squiggles and dots. 
Step Four: Wait till dry and paint with a clear coat.


The end result looks a little something like this...


I would love if you tried out some of these designs and tagged me on instagram @brightwithdelight or on twitter @karenmccord94 .
Stay tuned to my instagram account as I will be posting a short video on how to create these and more nail designs!


Monday, 28 July 2014

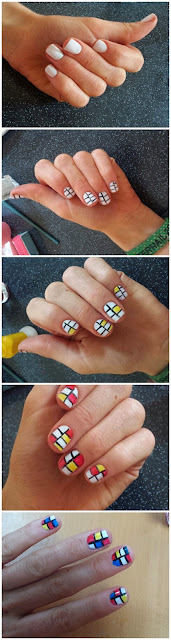
Weekend Manicure- Checkerboard Nails!


Okay so you've all probably guessed... I LOVE nail art! Trying out new and funky designs is one of my favourite things to do! My friends are always happy to help out because they get to be my hand models for new ideas LOL

Instagram and twitter are great #inspiration for new ideas. If you hashtag '#nailart',  '#naildesigns' or anything along those lines loads of beautiful and colourful designs will pop up on your screen. You tube is great for tutorials! 

 I bought acrylic paint a while ago and have been doing a few more detailed designs and here is the latest...


I bought the WAH NAILS book of nail art which inspired this cooolio piece:)
This is a step by step tutorial on how to create it yourself.


After filling in the squares I originally marked out with my black acrylic paint I went over the lines again to make it look more even.
It was the first time I used acrylic paint (I bought a mini set in tiger for 4 euro!  #bargain) and thought it was great because it dried in so fast! 

Tip of the Week:
Whatever you do during the week make sure you take some self care time out for yourself:) Do something you love it could be read a book, paint your nails, take a bath or watch a movie! 

xoxo


Wednesday, 2 July 2014

Top Nail Designs of 2014! :)


1.Nail Wheel of Fun 


2.YingYang Design 


3.Cheetah Design 


4.Leopard Print 


5.Flower Power! 


6.Pacman


7.Easter Egg and ChickNails


8.Funky Design 


9.French Manicure 


Saturday, 17 May 2014

Nature nails:)

'Nature does not hurry, yet accomplishes everything'-  Lao Tzu


The summer is slowly but surely creepy up on us and I LOVE it! There is nothing better then looking at your clock and realising it's 9 o'clock and the sun is still shinning:)
Nature is so beautiful and lately I've been enjoying going for a summer stroll in the evening and taking pictures of all the beauty around me. Here is a few of the snaps I took the other day...


One picture of flowers I thought was particularly nice and colourful was this one...


Which led to this creation...


'Do not rush, for the secret of life is patience. Everything that is meant to happen will come at the right time.'
xoxo

<a href="http://www.bloglovin.com/blog/12277559/?claim=68c7mt3nfzj">Follow my blog with Bloglovin</a> 


Friday, 9 May 2014

SJP Oscar De La Renta dress inspired nail design!

 
The theme for this years Met Gala was dedicated to America's first couturier, Chares James, which meant it was an extremely glamorous night!
When I seen pictures of Sarah Jessica Parkers Oscar De La Renta dress I thought it was very Carrie Bradshaw of her! It was black and ivory with a windowpane design at the back of the skirt. I am a massive fan of 'Sex in the City' and  it reminded me of the time her (Carrie Bradshaw not SJP) Russian Lover (lol) gave her a gift of a pink cocktail Oscar De La Renta dress!

Anyone remember this episode....
As they ate 'French fries' in black tie attire, how romantic...


I seen a cool nail design inspired by this fabulous dress and decided to give it ago. It turned out a little something like this...
 
 
'A warm smile is the universal language of kindness'
 
xoxo

Sunday, 27 April 2014

Monday manicure!


Happy Monday Morning beautiful people!:) Hope you all had a lovely weekend and are looking forward to all the fun times this week holds! #anythingispossible

This nail design pop up on my instagram and I thought it was so quirky and cool! It's probably one of my favorite yet most simple designs I've tried out recently. 


I put together a little film strip so you could all see how to do it:) 


Here's a picture of all the supplies I used:) 


Enjoy xxx

'You don't have to be great to get started, but to be great you need to get started'
#mondayquote

Thursday, 17 April 2014

Easter nails:)


Its Friday which means its time for a #weekendmanicure! Since it's Easter this weekend I thought I'd go with the theme of things and do an Easter inspired nail design. There are some amazing designs on instagram, facebook, twitter, everywhere really! I mixed it up a little by doing Easter Eggs (Aztec style) and little chicks:) 
Hopefully This might inspire some of you to try your own Easter Nails this weekend:)


  1. I started off painting one nail yellow and used three coats because the yellow I had wasn't great, this is going to be the nail we use to create the chick. I would pick your longest nail to do this :) 
  2. I painted the rest of my nails a light pink colour, it's better to use a lighter colour for the base of the Easter eggs as you can paint darker colours on top of it. 
  3. Using a black dotting tool make eyes for your chick and when the black drys in you can use a white dotting tool to make some pupils. Make a beck for your chick with a red/orange dotting tool.
  4. Mark off on the pink nails where you want your other colours to be and paint them in to the section you've made.:)
  5. Then just go wild with your design!! Draw a few lines in here, a few dots in there HAVE FUN WITH IT :)


When all is done Sit back and admire your beautiful nails with your favourite easter egg!:) My dream easter egg would have to be a milka one, I wonder if they make them actually hmmm.....

Have a great easter everyone and a fun bank holiday!! 
xoxo